How to install DOS 3.31 on VirtualBox?
Introduction
Originally 86-DOS, written by Tim Paterson of Seattle Computer Products, DOS was a rough clone of CP/M for 8086 based hardware. Microsoft purchased it and licensed it to IBM for use with Microsoft's IBM PC language products. In 1982, Microsoft began licensing DOS to other OEMs that ported it to their custom x86 hardware and IBM PC clones.
MS-DOS 3.31 was only sold through a few OEMs, mainly Compaq.
This version adds support for hard drives up to 512MB.
It also does not use as much conventional memory as DOS 4.x or later, making it a good choice for 8088/8086 based computers.
MS-DOS 3.30 is the first version you can install in VirtualBox but it requires you to resize the disk images. Version 3.31 is not much different from version 3.30 and installs on VirtualBox without any modifications.
Files Needed
- DOS 3.31 Archive
- Word 5.5 Archive (Optional)
Installing on other VM Software
Creating the Virtual Machine
Open up VirtualBox and select New.
A Create Virtual Machine dialog box will appear allowing you to select which operating system it will be using for this virtual machine (VM).
Enter the Name you want for your VM. In Type, choose 'Other'. For version, choose 'DOS'. Click Next. You will be presented with the option to choose the amount of RAM.
We will leave the default which is 32 MB. Click Next. Now the option is regarding a hard disk for the VM.
As we don't have any virtual hard disk, we will choose 'Create a virtual hard disk now'. Click on Create. The Hard Disk creation wizard will open.
We will choose VDI format but you can choose any format depending on whether you want to use the virtual machine with some other software in future or not. Click Next.
Choose Dynamically allocated. It allows you to save much space on the host OS. Many websites claim that using dynamically allocated hard disk slows down the guest OS, but I do not find it true. Click Next.
Here you can choose the size of the Hard Disk. For DOS 3.1 you can choose any value from 40 MB to 512 MB. We will leave the default which is 500 MB. Note that if you have chosen to create dynamically allocated disk, then the size of the disk will be very small at this point and it will continue to expand as you install programs and add files. It will not expand more than the size selected here. Click on create.
The wizard completes and you’ll see DOS 3.1 as an option that is currently ‘powered off’.
The VM has now been created. Now we need to add the installation floppy. Click on 'Empty' in the Floppy Device 0 option.
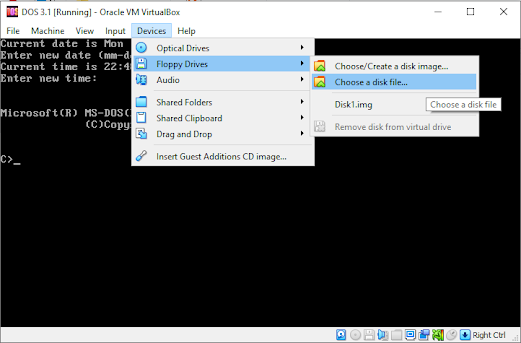
Click on 'Choose a Disk File' option.
Choose the 'disk1.img' file and click on open.
Now we need to change some settings for the virtual machine. Click on Settings.
Change the following settings.
- System > Acceleration tab > Deactivate Nested Paging
- Make sure Audio > Audio Controller is SoundBlaster 16
- Network > Adapter 1 > Disable network Adapter (shown below)
- Make sure USB > USB controller is disabled
Now the VM is ready to start. Click on 'Start' to start the VM.
Installing DOS 3.31
Once the Virtual Machine starts, it will ask for Date and Time. Since the default Date and Time are correct, press enter two times to continue with default date and time.
Type fdisk and press enter.
The fdisk utility will open.
Type 1 and press enter.
Type 1 and press enter.
Type Y and press enter.
Type Y and press enter.
Press enter. Again date and time will be asked. Press enter two times to accept the defaults.
Type format c: and press enter.
Type Y and press enter.
Press enter.
Wait till format is completed.
Type sys c: and press enter.
Type md c:\dos and press enter.
Type copy a:\ c:\dos and press enter.
Type copy a:\command.com c:\ and press enter.
Click on Devices> Floppy Drives> Remove disk from virtual drive. Then close the virtual machine. Choose to Power off the machine if it asks. Then start the virtual machine again. It should boot form c: this time.
Success! We have installed DOS 3.1 on VirtualBox.
Installing Word 5.5 (optional)
What OS is complete without some additional software? We can install Word 5.5 on DOS 3.31.
Click on Devices> Floppy Drives> Choose a disk file...
Choose the setup.img file and click on 'Open'.
Type a: and press enter.
Type a:\setup and press enter.
Press enter.
Press enter again.
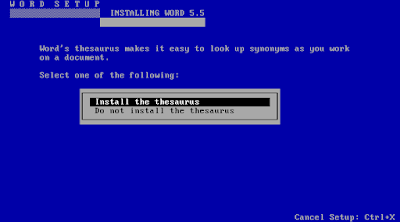
Select the options selected in the following pictures and press enter: -
At this stage choose the option that is applicable to you: -
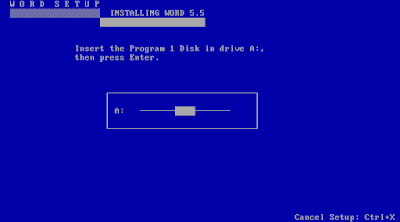
When prompted to insert the next Disk, Select Devices> Floppy Drive> Choose a disk file...
Choose the required disk and click on open then press enter.
At this step choose 'Update the system files'.
Click on Devices> Floppy Drives> Remove disk from virtual drive.
Then press enter.
After the VM has rebooted, type WORD and press enter to open word.
To exit word, click on File> Exit.
You can also see this video to install DOS 3.31 on VirtualBox: -
Conclusion
Please share this tutorial as much as you can.


Just been trying to do this using the setup.com file, but always get a general failure reading drive A. I was thinking this was an issue with my floppy image but take it this is a known issue, and is why you use sys c and copy the files manually instead of using the setup file.
ReplyDelete